Using routers for speedy internet connectivity is a common thing these days due to their ease of use. However, if you're not from a technical background, you might find yourself stuck in between the TP-Link Router setup process and face unnecessary embarrassment among your colleagues.
But going through this article will save you from such situations as we have covered a detailed step by step process for the TP-Link Router setup using default username and password.
About TP-Link Routers
TP-Link is one of the most purchased wireless routers across the world. Their Wi-Fi Routers are quite famous among other leading producers. Their products and technologies are always centered to be reliable and user friendly.
You can configure TP-Link routers by following some easy steps. The steps are very simple, and anyone familiar with a mouse and keyboard can setup a TP-Link Router.
Quick & Easy TP-Link Router Setup Wizard
After purchasing a TP-Link Router from the Market, you need to configure some default settings. This article consists of various steps that will guide you from start to end.
If you don't have a computer, you can use wireless tablets, laptops, and smartphones to complete the TP-Link router setup. You can go through the following steps one by one to configure the TP-Link router.
1. Connect TP-Link Router To Modem By Ethernet Cable
First of all, you need to bring an ethernet cable to connect your TP-Link router to the modem. It is important to establish a connection between two before installing your TP-Link Router setup. You can do so by following the given steps:
Step 1: Bring an ethernet cable to connect modem with the router.
Step 2: Insert one end of the ethernet cable into the Internet port of the TP-Link router. Now take the other end and insert it into the modem. Check if these ports are not loosely connected.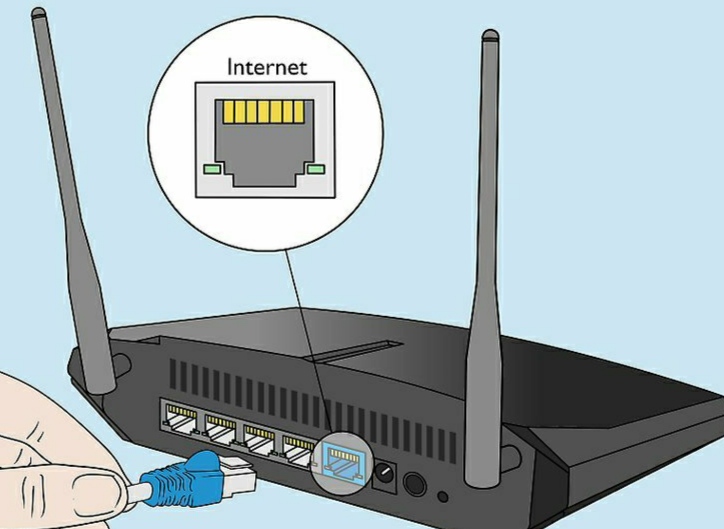
2. Connect TP-Link Router To Power
TP-Link is manufacturing adapter based routers. Thus you need to follow these steps to power on or off your router.
Step 1: Put on your power adapter and insert it into the router's power input port. This port is located at the backside of the router.
Step 2: Now, insert the other end of the adapter into the power source socket. 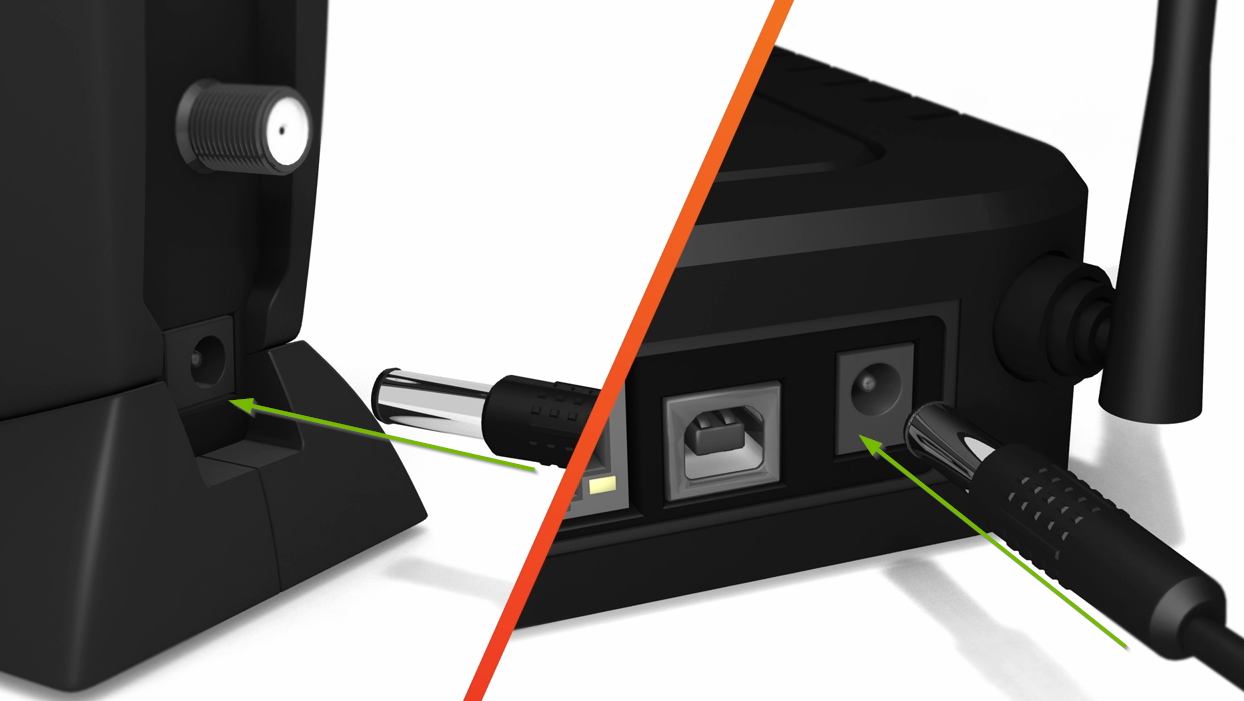
Step 3: Turn on the button and wait until all the lights start to blink dark green.
3. Log Into TP-Link Router Setup Wizard
After turning it on, you need to wait for a while until all the lights start to blink dark green. You can visit any browser on your computer and then follow these steps to log in to your TP-Link Router setup wizard:
Step 1: Type the given URL into the address bar of your browser: 192.168.1.1.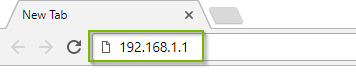
Step 2: It will redirect you to the login page. Fill and enter default login credentials:
Username: admin
Password: admin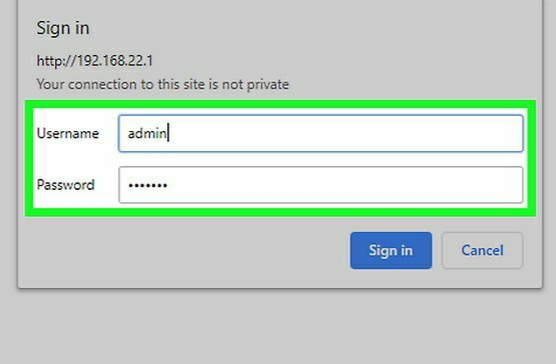
Step 3: Click on the login button to proceed further. It will redirect you to the TP-Link Router configuration page.
Also Read: 192.168.1.1 Login: Setup Your Wireless Router
4. Change TP-Link Router Login Credentials
Every router sets a default login id and password. Thus you need to change it after successfully logged in for the first time. You can change your default login credentials to secure it for the future. Therefore follow these steps to change TP-Link Router login credentials.
Step 1: Once you successfully logged in to the TP-Link router configuration page. Click on the Advanced Settings under System tools section.
Step 2: Now, click on the Administration option to proceed further. The Account Management window will appear.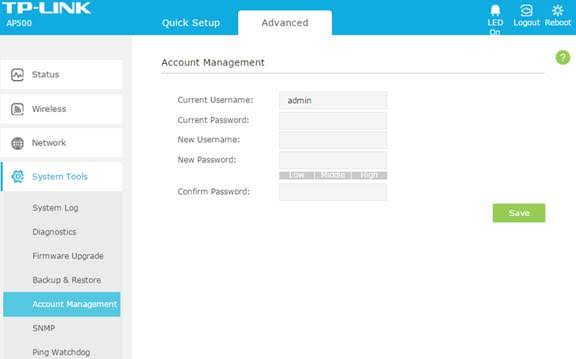
Step 3: Type your new password along with the router login name and old password. Confirm the new password by retyping it.
Step 4: Tap on the Save button to save the changes you made.
5. Change TP-Link Router SSID
The name of the router network visible to other wireless devices is known as the SSID. This SSID helps to find a unique network while searching for a router on your smartphone or computer. To change TP-Link Router SSID, follow these steps:
Step 1: After successfully logged into your TP-Link router setup wizard. Navigate to the Wireless Settings on the left side of the window.
Step 2: You will find Wireless Network Name (SSID) under Wireless Settings. The default name should be visible as TP-Link along with the model name. Tap on the name to initiate any changes.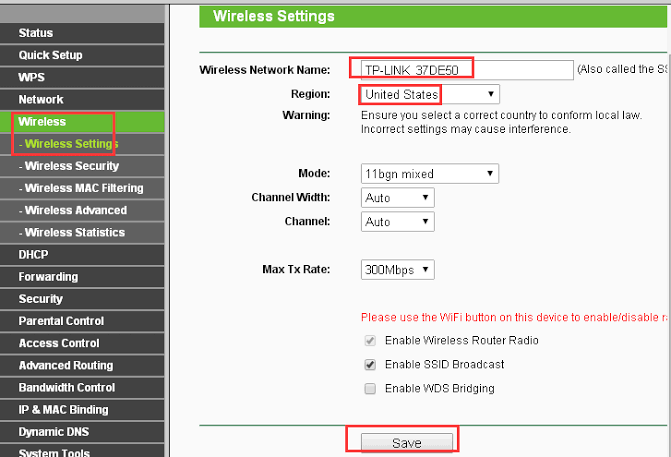
Step 3: Type any new SSID name of your choice. Click on the Save button to apply the changes.
6. Change Wi-Fi Password
Wi-Fi is a limited internet connection. Thus you need to secure it with a valid password so that only authentic people can connect to it. To do so you need to change the Authentication credentials. Follow these steps to make such changes:
Step 1: Go to the Wireless under settings and then go to the Wireless security window. Click on Enable Wireless Security option to proceed further.
Step 2: Select WPA/WPA2 to set security on your network. Now, under WPA-PSK, type your password to secure it. 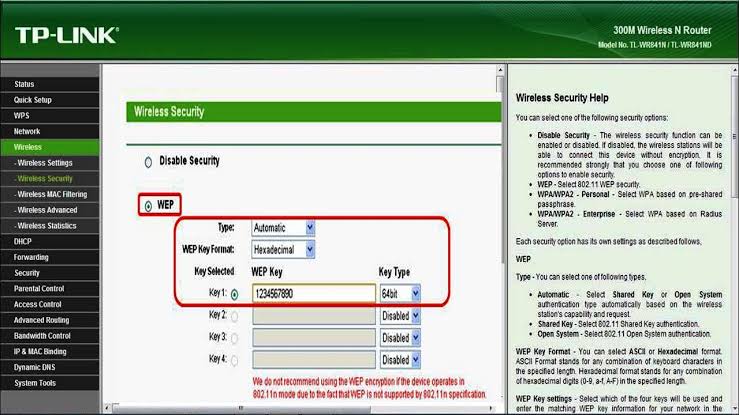
Step 3: Click on the Save button to apply the changes you made.
7. Update Your TP-Link Router Software
TP-Link Router updates are important to add new security features, fix vulnerabilities and enhancements like performance upgrades. Update your router to get the best possible security. You need an internet connection along with a computer, a USB flash drive for any contingency. The update process varies from one model to another.
The Bottom Line
These all are the steps you can try to complete the TP-Link Router setup. All the above-discussed steps are tested and are working effectively. You can apply these steps in the given sequence to set up your TP-Link router.
You can ask if you have any doubts while applying for any step. Feel free to contact us in the comment section given below.
Cheers!


